


I know it has been awhile since I posted here, but this project is worth waiting for.
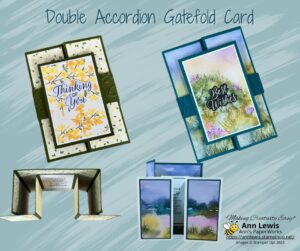
If you love making fancy fold cards, then you’re going to adore the Double Accordion Gatefold Card—also known as the Winged Gatefold Card. This unique card design is perfect for showcasing beautiful Designer Series Paper (DSP) and adds an extra wow factor to your handmade creations. Despite its intricate appearance, this card folds neatly to fit into a standard-sized envelope, making it a fantastic choice for special occasions. In this step-by-step tutorial that comes with a video tutorial, I’ll show you exactly how to create this stunning accordion-style gatefold card, including cutting measurements, scoring guides, and assembly tips. Don’t forget to LIKE, SHARE & SUBSCRIBE to my YouTube channel for more creative inspiration.
I used two different patterned papers for these projects – Floral Delight Designer Series Paper and Thoughtful Journey Designer Series Paper 6 x 6″. Grab your favourite Stampin’ Up! Designer Series Paper, and let’s get crafting!

Supplies Used
This card was designed in inches, but I have prepared a metric (cm) cut list as guide which can be found here.
Main Card Base
- Cardstock (Pretty Peacock) – Cut to 9-1/4″ x 5-1/2″, score at 5/8″, 2-5/8″, 6-5/8″, and 8-5/8″.
- Designer Series Paper (Thoughtful Journey):
- Four panels – Cut to 5-1/4″ x 1-3/4″.
- Centre panel – Cut to 5-1/4″ x 3-3/4″.
Wing Card Base
- Cardstock – Cut to 10-1/16″ x 3-3/4″, score at 2″ and 4″ on both ends.
- Cardstock panels – Cut to 1-3/4″ x 3-1/2″ (you’ll need five).
- Designer Series Paper panels – Cut to 1-5/8″ x 3-3/8″ (you’ll need four).
Belly Band
- Pretty Peacock Cardstock – Cut to 10-1/8″ x 1″.
- Pretty Peacock Cardstock (Layer for Sentiment) – Cut to 4-1/8″ x 2-3/4″.
- Basic White Cardstock (Sentiment Layer) – Cut to 3-7/8″ x 2-1/2″.
- Designer Series Paper (Top Layer) – Cut to 3-3/4″ x 2-3/8″.
Assembling Your Card (see video tutorial for detailed instructions)
Step 1: Create the Main Card Base
- Score and fold the Pretty Peacock cardstock along the pre-scored lines to create the gatefold effect.
- Adhere the Designer Series Paper panels to the front and inside sections of the card base.
Step 2: Assemble the Winged Base
- Score and fold the 10-1/16” x 3-3/4” cardstock at 2” and 4” on both ends.
- Adhere the Designer Series Paper panels to the corresponding sections.
- Attach the centre panel of the Winged Base to the middle of the main card base, ensuring it aligns properly.
Step 3: Create the Belly Band
- Wrap the 10-1/8” x 1” Pretty Peacock cardstock loosely around the closed card and adhere the overlapping ends with Tear & Tape. Ensure it slides on and off easily.
- Layer the Pretty Peacock, Basic White, and Designer Series Paper pieces on the front of the Belly Band for decoration.

Final Touches
- Add embellishments, stamping, or a sentiment to personalise your card.
- Depending on the number of layers and embellishments, you may need extra postage when mailing this beauty!
This card has such a versatile design that it allows you to showcase so many of our gorgeous Designer Series Papers. This will be one of the projects featured at my next event – Exclusive Creative Class for Stampers.
I’d love to see how yours turns out—feel free to share your creations in the comments.
Stampin’ Up! Product List")
 Designer Series Paper")


")


 Designer Series Paper")


")
