


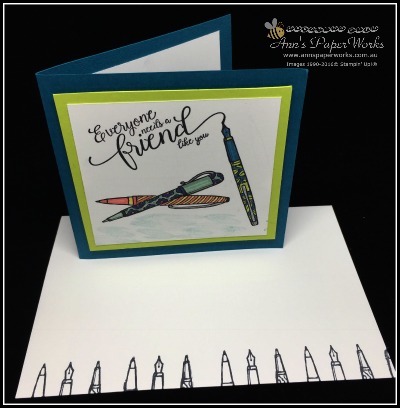
Thank you card tutorial
The story behind this special card is included in the previous post. As the card features a number of different techniques, I thought a quick tutorial would help out. This card is probably not suitable for beginner stampers, but it is a fun card to create if you are a more experienced. crafter or want to try some new techniques. Check out the thank you card tutorial below.
Time to complete: 1 hour
Cutout:
Island Indigo card base: 8-1/4″ x 4-1/8″ folded in half
Lemon Lime Twist layer: 3-7/8″ square
Whisper White Layer: 3-1/2″ square
Products used:
Stamps: Crafting Forever; All Things Thanks; Suite Sentiments; Playful Backgrounds;
Cardstock: Lemon Lime Twist; Island Indigo; Whisper White;
Inks: Archival Basic Black; Tuxedo Memento Black; Soft Sky;
Stampin’ Write Markers: Calypso Coral, Night of Navy; Lemon Lime Twist; Mint Macaron; Daffodil Yellow; Island Indigo;
Accessories: Stamp-a-ma-jig; full adhesive Post-It note or some other low tack masking paper.

Thank you card ‘tutorial’ – tips and tricks
Step 1: Stamp your cursive sentiment in the left hand upper corner (Archival Basic Black), ensuring that there is enough room for your pen to be stamped at the appropriate angle. Stamp the three-pen image onto the clear Stamp-a-ma-jig overlay, following the instructions included in the box. It is a little hard to pick up the clear stamp-a-ma-jig overlay in the photo. I would recommend using Tuxedo Memento Black ink so that the overlay doesn’t stain (how do I know that?????).
Step 2: Line up the clear overlay pen image that you want to have ‘drawing’ your sentiment.
Of course, you could actually cut up your stamp into three pens and this card would be really easy. If you did decide to divide your stamp into three single pen image, it would not affect its usability.
Step 3: Cover two of the pens with some leftover washi tape to protect them when inking up. Ink the stamp well with Archival Black. Remove the washi tape from the stamp and throw away. You will now only have the pen you have selected inked. Following the steps included with the Stamp-a-ma-jig, remove the overlay and carefully stamp the pen image. As you have lined it up with the stamp-a-ma-jig, it will be easy to stamp the pen image exactly where you want it.
Step 4: Stamp one of the other pen images at an angle, using the same technique as in Step 3. Remove the washi tape from your stamp prior to stamping.
Step 5: Stamp the same pen a second time on your Post-It note (mine was bright pink post-it note) and fussy cut. Carefully line up mask and place over your stamped image as pictured. This mask protects your stamped image when you stamp the remaining pen over this image. Stamp the remaining pen over the top of the already stamped image. The last pen stamped will appear to be underneath the previous one. Remove the mask and it will look fantastic.
Step 6: Colour your pen images with Stampin’ Write markers of your choice.
Step 7: Assemble the card. Decorate the card insert and envelope. I stamped a border row of the pens along the bottom edge of the insert and envelope.
Where do I get these products from?
The supply list from yesterday’s past has been updated. Crafting Forever Stamp Set, In-Color 2017-19 In-Color Markers and In-Color 2017-19 In-Color Cardstock will only be available from 8am 1 June. The Suite Sentiments Stamp Set will not be available after 31 May (maybe sold out prior).
Stampin’ Up! Product List
For further information for the products used in this project, click on the items below to view in my Online Store. I would love to be your Demonstrator if you don’t already have one and live in Australia. All these products can be purchased through my online shop or ordered through me. Please allow Demonstrator contact when ordering online so I can thank you properly. Stamp sets used in this project may be available in other mount options (wood-mount, clear-mount or photopolymer). I have listed the option that I used.


After creating this card, I know that Lemon Lime Twist from the new 2017-18 In-Colors will become one of my favourites. Thanks for dropping by. Need a hand with this card, just contact me and I will be happy to help.
Do you use your Stampin’ Write Markers all the time. Looking for a new use of them? Check out this short YouTube video by Stampin’ Up!featuring the markering technique.