A Special Handmade Christmas Gift
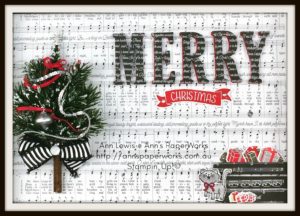
Every year I design a project that I can use as that ‘one special gift’. And I know just who is going to be the recipient of this handmade Framed Christmas Tree featuring the Merry Music Specialty Designer Series Paper. Last year I made a framed sampler featuring the Santa’s Sleigh bundle. This project was also featured in my Christmas Extravaganza along with the Hearts come Home Ornament.
This year those lovely Green Sprigs (#144627) from the Occasions Catalogue inspired this project. It had been running around in my head for a few months before I actually created it. The framed Christmas Tree itself is not difficult but the entire project would take a few hours. It seemed that the embellishments in the Holiday Catalogue were just made for this project – 7/8″ Striped Ribbon, Mini Ornaments, Silver Mini Sequin Trim, Year of Cheer Embellishments and, of course, the Green Sprigs. This project was the feature project at my Christmas Extravaganza. The decorations on the tree were inspired by Liz Collett, my talented upline.
So how does this project come together?
Framed Christmas Tree Ingredients:
- Full pack of Green Sprigs – may only use nine of the 12, depending on placement.
- Two contrasting sheets (12″ x 12″ or 30 cm x 30 cm) of Merry Music Specialty Designer Series Paper – one to form the project base. The second sheet is used to die cut the word “MERRY”.
- One piece of Real Red cardstock (8″ x 4″ or 20 cm x 10 cm) for the background die cut layer of the word “MERRY”. You will die-cut MERRY twice – Real Red C/S and the Merry Music Specialty DSP.
- Shimmery White Embossing Paste (available 3 January 2018 in the Occasions Catalogue) applied to the tips of the Green Springs to resemble snow – needs some time to dry.
- Glue Dots to attach the ends of the Silver Mini Sequin Trim and Real Red 1/8″ Solid Ribbon underneath the branches.
- Silver Mini Sequin Trim (10″ or 26 cm) for decorating the tree.
- Real Red 1/8″ Solid Ribbon (18″ or 45 cm) for the small bow on the tree and decorating the tree.
- 7/8″ Striped Ribbon – 10″ (25 cm)
- One Clear Faceted Gem for decorating large black and white faux bow.
- One silver Year of Cheer Embellishment for tree star.
- Various inks and piece of scrap Whisper White cardstock for the presents – I used Always Artichoke, Real Red, Smoky Slate, Daffodil Delight in various combinations. The presents were layered at different heights using Foam Adhesives Strips, Stampin’ Dimensionals, Mini Stampin’ Dimensionals and Multipurpose Liquid Glue (#110755).
- Brightly Lit Christmas Bundle for the presents.
- A scrap piece of Merry Music Specialty Designer Series Paper for the present box.
- A piece of scrap Whisper White cardstock for the ‘Pretty Kitty’, then coloured with Stampin’ Blends (Smoky Slate, light and dark, and Colour Lifter for the eye area) and fussy cut out.
- A piece of scrap Whisper White cardstock for the sentiment “CHRISTMAS”, stamped in Real Red.
- Many of these products will not be available after 3 January 2018.
Non-Stampin’ Up! Products
- Craft Dowel 3″ (7.5 cm) (mine came from the cheap shop). I inked up the Hardwood background stamp (#133035) in Soft Suede and rolled the piece of dowel across the stamp. You could easily also roll the piece of wood across an Early Espresso or Soft Suede ink pad for a similar effect.
- Hot Glue Gun for gluing the Green Springs to make the tree; for securing the tree trunk to the Merry Music Specialty Designer Series Paper base; attaching the Year of Cheer Embellishment, Mini Ornaments and Silver Sequins to the finished tree. I used my heavy-duty Bosch from the hardware store as it has a long nozzle. Warning – hot glue is actually hot, so be careful.
- Frame from Ikea – my frame was 8-1/4″ x 11-3/4″ (21cm x 30cm). This frame is no longer available but you could use an Ikea Ribba Box Frame 9″ x 9″. For this size frame, the word ”MERRY” would be placed at an angle across the page.
 Tips and Tricks
Time required: 3 hrs Experience Required: Suitable for experienced crafters
- To apply the “MERRY” sentiment, I used a faux eclipse technique. Rather than die cutting the Merry Music DSP base, I die cut one set in Real Red and one set in the contrasting Merry Music DSP. I adhered the Real Red “MERRY” to the Merry Music base using Multipurpose Liquid Glue. Using Foam Adhesive Strips, I adhered the Merry Music Letters on top of the Real Red letters to make them pop.
- The ‘CHRISTMAS’ sentiment came from a retired stamp set, Time of Year (hostess set).
- To make the present box, I used the Wood Crate Framelits and cut the die-cut down to a rectangle.
- I randomly adhered some sequins to break up the ‘white space’ on the Merry Music base.
- To build the tree, I glued the trunk down with hot glue, making sure there was enough room at the top and sides for the branches. Before attaching the branches, I lay out my tree and experimented with the placement of the branches. The top branch is vertical, whilst the lowest branches are horizontal. The horizontal branches are attached last. I applied hot glue to the underside of each branch. These were attached.
- Tree decorations were attached after ‘snow’ (Shimmery Texture Paste) was applied.
- The large black and white bow was not tied in the traditional way. I made the cancer symbol, making sure that only the right side of the ribbon was facing me. I ‘squished’ up the middle of the ribbon to form a bow and wrapped the Baker’s Twine around the centre and tied off. The bow was hot glued to the tree after all the branches were attached, to hide any tiny imperfections.
Stampin’ Up! Product List
The products used for this project are available from my Online Store. For further information about the products used in this project, click on the items below. I would love to be your Demonstrator if you don’t already have one and live in Australia. All these products can be purchased through my online shop or ordered through me. Please allow Demonstrator contact when ordering online so I can thank you properly. Stamp sets used in this project may be available in other mount options (wood-mount, clear-mount or photopolymer). I have listed the option that I used. If you are shopping online and your order is under $250, please use current (December) Host Code ZZ67KCY3. The majority of products used in this project retired on 3 January 2018. If you would like to make this project for Christmas next year, now is the time to purchase what you require.
Need help with this project, leave a comment. This might be my last post before Christmas, so Merry Christmas to you all. Thanks so much for your support throughout the year. And remember that the best time of the Stampin’ Up! year starts on 3 January 2018 with the release of the Occasions Catalogue and Sale-a-Bration. Amazing products and fabulous special offers that you will not want to miss out on. Live in Australia and would like me to be your demonstrator, contact me for your FREE copy of the new Occasions Catalogue and the Sale-a-Bration brochure.


Very nice Ann. Love it.
Thanks for the lovely feedback, Madonna.