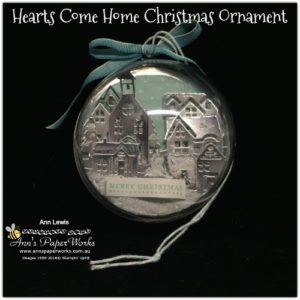
Handmade Christmas Ornament for the Global Stampers Blog Hop
It is that time of the month again when stampers from around the globe showcase their talents as part of the Global Stampers Blog Hop. The theme for this month is a colour challenge of ‘silver, blue and metallic’. Check out everyone’s projects via links below. I have long wanted to make a hanging handmade Christmas ornament and this challenge proved to be the incentive.
The obvious choice of product to feature was the Hearts Come Home Bundle, which is certainly my favourite bundle from the Christmas Holiday Catalogue. The dies are so detailed and tending towards the miniature which makes the images just the right size for such a project. I have featured this bundle previously – check it out here. I was very happy to see that the Hearts Come Home bundle will be carried over into 2018, even though not as a bundle (so from 3 January 2018 there will be NO 10% saving for purchasing both the stamp set and Edgelits together).
These baubles were just some of the many goodies I picked up on my visit to Salt Lake City for OnStage. But I have since sourced them in Australia on eBay.
This is a relatively simple project, once you know how to assemble.
Details of Layers (in order from bottom)
3-1/4″ (8.25 cm) circle Whisper White Cardstock
three 1/2″ metal washers to add weight to allow the ornament to hang evenly. These washers were placed as close as possible to the circle edges and evenly placed to provide the correct balance (adhered with Tear and Tape)
3-1/4″ (8.25 cm) circle diecut from Silver Foil Sheet (adhered with Tear and Tape, top and bottom)
3-1/8″ (8cm) circle Pool Party snow pattern die-cut from the Christmas Around the World Designer Series Paper (adhered with Tear and Tape)
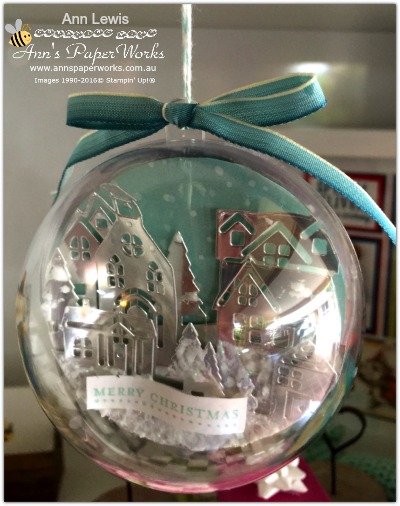
three 3-1/8″ (8cm) Silver Foil Sheet Circles, die-cut using the Hometown Greetings Edgelits Dies (see photo below for placement).
Shimmery White Embossing Paste (used as snow) (#145645) – this product is available from 3 January 2018 as part of the 2018 Occasions Catalogue release.
Merry Christmas Sentiment (Fine Tip Glue Pen)
Half Bauble secured using the Fine Tip Glue Pen. I adhered the edge of the bauble, and then attached the bauble to the Silver Foil layer which is slightly larger than the die-cut pieces. I allowed it to dry but before moving the bauble, I applied another thicker layer of the Fine Tip Glue Pen where the bauble and Silver Foil circle join, to completely seal it.
Assembly of Handmade Christmas Ornament
Each of the three Silver Foil circles was die-cut with a different edgelit from the Hometown Greetings Edgelits Dies and at a different height and making sure, where possible, that each layer lines up with a gap from the previous layer. All three of the silver foil layers, once die-cut, are adhered using Mini Dimensionals, some cut down to make even smaller. Make sure that you carefully secure as many pieces as possible (especially the rooftops) to make sure that the layers do not move or collapse forward.
Apply the ‘snow’ sparingly to each of the layers prior to assembling. Allow to dry.
The sentiment ‘Merry Christmas was stamped onto scrap whisper white cardstock, punched out with the Classic Label Punch and then trimmed to size. I then shaped the sentiment label with the bone folder to make it ‘curl’.
Whisper White Baker’s Twine was threaded through the hanger and then tied into a knot to finish. The Island Indigo bow (10″ or 25 cm) was adhered using two Mini Glue Dots.
This has been such a popular project that I have now included it as a project for next Sunday’s all-day event, the Christmas Extravaganza, which is now completed booked out.
Stampin’ Up! Product List
For further information about the products used in this project, just click on the items below to view in my Online Store. I would love to be your Demonstrator if you don’t already have one and live in Australia. All these products can be purchased through my online shop or ordered through me. Please allow Demonstrator contact when ordering online so I can thank you properly. Stamp sets used in this project may be available in other mount options (wood-mount, clear-mount or photopolymer). I have listed the option that I used. If you are shopping online and your order is under $250, please use current Host Code ZZ67KCY3.
Don’t live in Australia – find your closest demonstrator by clicking on a link below.
Global Stampers Blog Hop
Feeling inspired?
Happy Crafting.


Is the ornament you used round and you used only half or did you buy half ornaments?
Hi Page. Thanks for dropping by. The ornament is round, splits in the middle and I only used half. I hope this answers all your questions.
I saw this on Facebook and loved it. I would love to give it a try!
I am glad you like it. It is quite easy to make.
TROP TROP BIEN LOVE
Hi Nathalie. Welcome back. Thanks for the lovely feedback.
Très jolie déco de noel, bravo
Thanks Valerie. Thanks so much for dropping by and leaving such lovely feedback.
Beautiful ornaments! And thank you so much for the instructions! What is the name of the bauble so that I may source them locally? ?
Thanks for your lovely comments, Pam. It is an 3-1/8″ fillable plastic bauble. And this one came from Michaels because I have just returned from Stampin’ Up!’s OnStage Live and I picked up a few goodies whilst I was away. Fillable baubles mean that they split in the middle so you can just use half like I have. Barcode 1 9151843195 7.
What can I say? Simply wow. Thanks for sharing the instructions too. X
Oh thanks Fiona. Your comments have made my day.
Oh Ann! These are gorgeous & I love them so much. Thanks for sharing ?
Thanks Alicia. I am so glad you like them. Doing the ornament for a class next weekend as well. So hoping the ladies like the ornament as well.