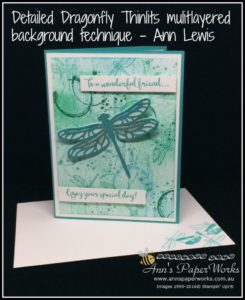
 Collage Stamping Technique
Dragonfly Dreams has proved to be one of the most popular bundles from the 2017 Occasions Catalogue and it is certainly a favourite of mine. This was one of the projects that I designed for the Better than Hallmark class last Friday night and features the Collage Stamping Technique. The card does look a little difficult but if you create it, step by step, it is so much fun and pretty easy. It is also a card that you need to show some patience with. Wait until you have finished all your layers before assessing how well you went. No two cards will be the same.
I had three ‘stamping virgins’ at this class and they all found the technique easy and a lot of fun. Whilst I have used quite a few stamp sets, this is one card that you can raid your stash for. So many Stampin’ Up! stamp sets include some texture or background stamp which can be used for this technique.
How did I create this collage stamping technique card?
Cardbase: 5-1/2″ x 8-1/4″ Bermuda Bay Cardstock (C/S)
1st layer: 5-3/8″ x 4″ Whisper White C/S
top layer: 5-1/8″ x 3-3/4″ Whisper White C/S
Scrap Bermuda Bay and Whisper White cardstock for dragonfly and sentiments.
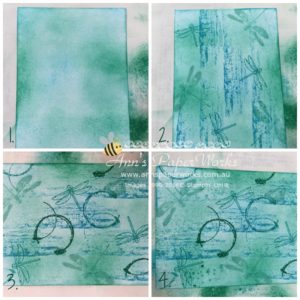
Step 1 (see photo):
A. Lightly apply an even base colour in Pool Party using the sponge brayer. Don’t panic if this layer is not perfect. There is loads more layers that cover this layer.
B. The second layer is sponged . using Stamping Sponges in the following colours: Tempting Turquoise, Bermuda Bay and a little Emerald Envy.
I used a circular motion, starting off the page and moving onto the page which created a more even coverage. Each of these colours were applied in three different areas in a rough triangular shape. Pool Party was used to smooth/even the colours out.
Step 2:
A. In Tempting Turquoise, stamp the ‘line’ image from the Gorgeous Grunge Stamp Set, vertically across the cardstock (see photo).
B. In Bermuda Bay, randomly stamp the line dragonfly from the Touches of Texture Stamp Set three times and the solid dragonfly from the Awesomely Artistic Stamp Set three times.
Step 3:
A. In both Emerald Envy and Bermuda Bay, randomly stamp three circle images from the Timeless Textures Stamp Set. This provides some opportunity to ‘hide’ any less than perfect areas.
B. Sponge the cardstock edge using Bermuda Bay ink.
Step 4:
A. In Pool Party, stamp the ‘lace’ image from the Timeless Textures Stamp Set at an angle randomly across the layer. This is a very subtle effect which adds dimension.
B. In Emerald Envy, stamp the ‘dot’ image from the Awesomely Artistic Stamp Set, inking once and stamping three times to give the effect of a lighter colour. Repeat this step once more randomly across the layer.
Step 5:
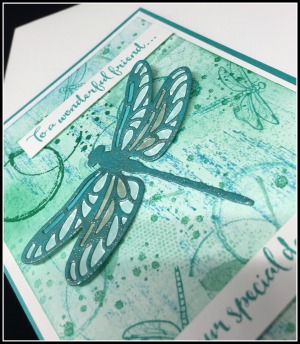
Die cut one Bermuda Bay dragonfly shape using the detailed dragonfly die. Apply Clear Wink of Stella to die. Die the background layer of the dragonfly in Whisper White C/S. Assemble dragonfly and then lightly colour the dragonfly’s background with Stampin’ Write Markers – Pool Party, Soft Sky and Bermuda Bay. Adhere to project.
Stamp and adhere sentiments.
I hope you enjoyed this project featuring the collage stamping technique. It was so much fun to create. If you have any questions, don’t hesitate to contact me.
Tomorrow, Friday 31 March 2017 is the last day of Sale-a-Bration. All the details are included in my latest newsletter with an update here. Have you placed your order yet?
Stampin’ Up! Product List
For further information for the products used in this project, just click on the items below to view in my Online Store. I would love to be your Demonstrator if you don’t already have one and live in Australia. All these products can be purchased through my online shop or ordered through me. Allowing Demonstrator contact when ordering online means I can thank you properly. Stamp sets used in this project may be available in other mount options (wood-mount, clear-mount or photopolymer). I have listed the option that I used.


I love your card Ann. I think I will case this for my Better than Hallmark class.
I am so glad you like it Joyce. And I was surprised how everyone, even my newbies, handled this card. Every card turned out well. Thanks so much for dropping by and leaving a comment. It makes my day.
Beautiful Ann!!
Thanks Kay. Glad you liked it. And thanks for dropping by.