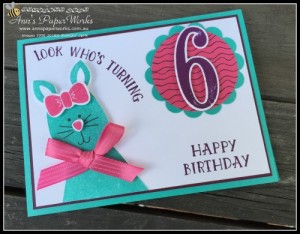
I don’t get to create too many kid’s cards but I always have lots of fun when I do. When I purchased the Playful Pals bundle, I have to say that whilst I thought they were super cute, I didn’t necessarily think I would use them that much – but I have. They are so much fun to work with. And every time I look at this card, I just smile.
Let me know what you think of this new format with the tutorial included. Each of the items on my supply list all link directly to my online store for more information. More updates to my website coming, so come back and visit soon. If something doesn’t work as it should, let me know so that I can fix it. Enjoy your day and thanks for dropping by and if you like this card, share on social media, including Pinterest.
Directions:
- Cut Melon Mambo card base 8-1/4″ x 4-1/8″, Blackberry Bliss layer 5-1/4″ x 3-7/8″, and Whisper White top layer 5-1/8″ x 3-3/4″ .
- Stamp cat’s head, ears and body (triangle) in Bermuda Bay. Stamp facial features of eyes, whiskers and mouth in Memento Black Ink. Stamp bow and cat’s nose in Melon Mambo.
- Die cut the bow, ears and nose using the Playful Pyramid Thinlit Dies. Fussy cut the cat’s face. Fussy cut the body (triangle). Adhere the ears to the top of the face (Multipurpose Glue), the bow and nose with Stampin’ Dimensionals.
- Adhere the body of the cat (triangle) at an angle partially onto the Whisper White layer. Trim overhang. Using Stampin’ Dimensionals, attach the head. Add Melon Mambo ribbon bow.
- Stamp in Blackberry Bliss the sentiments ‘Look Who’s Turning’ and Happy Birthday (Number of Years Stamp Set), directly onto the Whisper White layer. Stamp the number 6 in Blackberry Bliss and die cut number using the Large Numbers Framelits Dies.
- Punch out 2-3/8″ Bermuda Bay Scallop Circle and 2″ Melon Mambo Circle. Using wave stamp from the Playful Pals Stamp Set, stamp background onto Melon Mambo Circle in Memento Black. Adhere the Melon Mambo Circle onto the Scallop Circle and then adhere ‘number 6′ with Stampin’ Dimensionals. Attach onto the Whisper White layer in the right hand corner. Assemble card.


Thanks Ann for the extra instructions. Fran 🙂
Love this card Ann so cute, and excellent instructions…
Glad you like it, Fran.