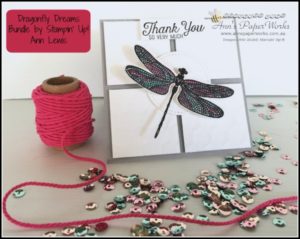
Dragonfly Dreams sparkles
I needed a special thank you card. Ever since I saw the Hexagon Dynamic Textured Impressions Embossing Folder, I have had this card in mind. The embossing folder creates such a beautiful texture (which sadly does not show up in this image). My idea was to emboss a piece of Whisper White cardstock, cut it into four equal squares, rotate some of the squares to form a different pattern. Whilst this did not create the impact that I had anticipated, I have still fallen in love with this card.
The water-coloured Dragonfly Dreams die cut adds the splash of colour this card needed to take it from blah to WOW!
Tips and Tricks on how to make Dragonfly Dreams card
- Smoky Slate card base 8-1/4″ x 4-1/8″; Whisper White cardstock 4″ x 4″ embossed with the Hexagons Dynamic Textured Impressions Embossing Folder. Trim into four squares 1-7/8″ square. It is important that use a trimmer with a very sharp blade as the embossing makes it more challenging to get a clean cut.
- Diecut second smallest circle from the Stitched Shapes Framelits Dies.
- Stamp the Dragonfly Dreams image in Archival Basic Black onto a scrap piece of Whisper White cardstock. As this is a photopolymer stamp set, make sure you use the Paper Piercing Mat underneath to ensure the full image is stamped.
- Colour using Watercolor Pencils. I coloured each of the sections of the dragonfly wings in either Melon Mambo and Bermuda Bay (my two favourite colours). These were blended using the Wink of Stella. This is an interesting technique as the Wink of Stella blends as well as the Blender Pens but has the added advantage of the gorgeous shimmer. I always recommend allowing the Archival Ink to dry for a few minutes before colouring.
- Stamp the sentiment from the Flourishing Phrases in Archival Black Ink on a Whisper White cardstock scrap.
- Assemble the card. The Whisper White squares and die-cut circle are all adhered using Stampin’ Dimensionals. The sentiment and Dragonfly die cut are adhered using Foam Adhesive Strips.
- The inside of the card is stamped with the dragonfly image, partially stamped off the Whisper White layer.
Need any help with this card, don’t hesitate to contact me.
Stampin’ Up! Product List
All these products are available from my online store. For further information on the products used in today’s project, just click on the items below to view in my Online Store. I would love to be your Demonstrator if you don’t already have one and live in Australia. All these products can be purchased through my online shop or ordered through me. Please allow Demonstrator contact when ordering online so I can thank you properly. Stamp sets used in this project may be available in other mount options (wood-mount, clear-mount or photopolymer). I have listed the option that I used.


