


Congratulations card featuring Grateful Bunch Stamp Set Stampin’ Up!
Keeping it simple Grateful Bunch congratulations card.
On this occasion, I needed a congratulations card for a new member of my team, the Crafty Paper Bees. And yes, I did want it to be special because becoming a Stampin’ Up! demonstrator is something special – the start of a new and sometimes challenging journey.
If you regularly follow my blog, you have probably realised that I ‘ walk the talk’ when it comes to sending cards. I send cards to my family, friends and colleagues for all those important occasions as well as ‘just because’ – and sometimes just as a RAK (Random Act of Kindness). I do so because I know that it makes a difference and that they are appreciated.
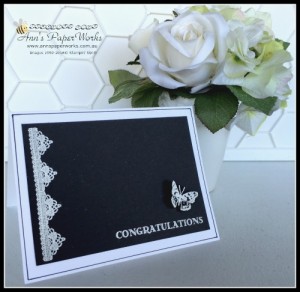
Often I will spend too much time coming up with a fancy card design featuring different products, colours and embellishments when plain and simple would work even better. This is one of those cards. Originally, I had a grand design in my head, but couldn’t make it work, so I pared it back to the absolute basics. This card only has three elements – the border stamp, the butterfly and the sentiment.
Black and White Embossed Grateful Bunch Congrats Card Tutorial
Fold Whisper White card base (8-1/4″ x 5-1/2″) in half and reinforce fold with bone folder.Stamp border pattern from Grateful Bunch Stamp Set in Versamark Ink on left hand side of Basic Black cardstock layer (3-7/8″ x 5-1/4″) as pictured.
Heat emboss with white embossing powder. Stamp sentiment from Guy Greetings Stamp Set in Versamark on the bottom right hand side of Basic Black cardstock layer. Heat emboss with white embossing powder.
Stamp butterfly from Grateful Bunch Stamp Set in Versamark Ink on a scrap piece of Basic Black cardstock. Heat emboss with white embossing powder. Fussy cut butterfly, fold wings up slightly to add the illusion of movement, and adhere using Glue Dots.
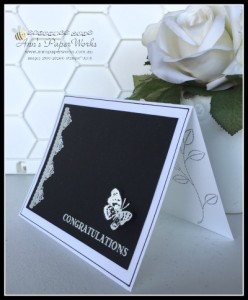
Draw a border around the edge of Whisper White cardstock card base (front only as pictured). This border is hand drawn using a ruler, black marker and is about approximately 2 mm / 1/8″ inside the card edge. Adhere Basic Black layer to the Whisper White card base.
Stamp the inside of the card in Basic Black ink with the border stamp (I did stamp the leaf pattern on mine but I think repeating the pattern on the front of the card is a better design.
Supplies available from my online shop
|
|
||
|
|
|
|
|
|
|
|
|
|


