


Criss Cross Card featuring Stampin’ Up! Rose Wonder Stamp Set
Criss Cross Card
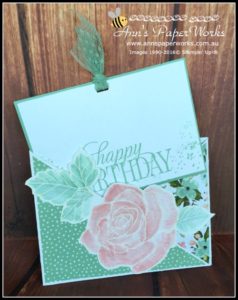
Do you sometimes create a card that you just love? This is one such card. It is a technique card with some easy water-colouring. It is also an unusual card in that you create a criss cross pocket sleeve and a single sheet card insert containing the sentiment. It is not a difficult card but a little bit of care needs to be taken when assembling.
What makes the watercolouring easy is that it uses the emboss resist technique and also you fussy cut the image which means that if you go outside the lines it doesn’t matter. The ‘natural’ shading on the flower and leaves is caused by the colour transfer when the aqua painter is first inked up.
Sad to see this beautiful paper (Birthday Bouquet DSP) retire on 1 June 2016.
Details of Criss Cross Card
- Two pieces of Whisper White cardstock 4-1/4″ x 11″ scored at 5-1/2 inches; One side of each piece of Whisper White cardstock is cut diagonally from corner to score line (search Criss Cross cards for one of the many YouTube videos if you are unsure of how to cut and assemble this card). The two triangles that you cut away can be discarded for this project. Adhere the two pieces of Whisper White Cardstock together (lining up the rectangular pieces), making sure that you do not overlap over the score lines. The two triangles are at opposite ends – you now have one piece of cardstock measuring 5-1/2″ at the top and 16-1/2″ at the bottom, with the sides angled from top to bottom. Fold in flaps to make the Criss Cross Card.
- Designer Series Paper (DSP) 5-1/4″ x 4″ (I used Birthday Bouquet which is retiring in two days) cut diagonally from corner to corner; adhere the two DSP triangles to front of card. Secure flaps at the bottom using Tear and Tape Adhesive.
- Stamp Rose Wonder image in Versamark and heat emboss the Whisper White Embossing Powder onto scrap piece 4″ x 5-1/2″ Whisper White Cardstock. Water colour image using Blushing Bride and Mint Macaron and an Aqua Painter. Add some Wink of Stella accents to the flower only (this helps to even out some of your watercolouring). Allow to dry prior to adhering to front of card.
- Card insert: 5 x 3-1/2″ Mint Macaron card base; 4-7/8″ x 3-3/8″ Whisper White, stamped with sentiment in Mint Macaron (I used hostess stamp set, Happy Birthday, Everyone retiring 1 June 2016). Add some background stamping in Mint Macaron using the dot pattern stamp from Timeless Textures Stamp Set (one of my favourites). Adhere Whisper White layer to Mint Macaron card base. Punch hole at top of card insert (through the two layers). I used the Curvy Corner Trio punch (retires on 1 June 2016) but any hole punch would work just as well.
- Enjoy.
2016-17 Stampin” Up! Annual catalogue
The new catalogue will be released on 1 June 2016 and it is full a fabulous new products and a few of our old favourites. Live in Australia and need a catalogue, contact me. The new catalogue is also available online here from mid morning Wednesday 1 June 2016. Visit my online shop to see all the fabulous new products. Don’t that the bundles from the current catalogues are not carrying over to the new catalogue – so get in for your favourites before you miss out.
Stampin’ Up! Product List


